|
|
|
![]()
Building the Big Jungle Gym Ceiling
The ceiling isn't so hard to make - and it looks and works great!
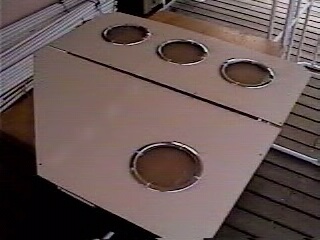
I produce the ceiling
in two panels, but only because I have to ship them out.
You don't need to cut your ceiling in half.
At Home Depot, in the
paneling department, are sheets
of melamine 1/8" thick. It's called 'Tile Board'.
If you went shopping with
the Material List, you already have
several of these 4 x 8 foot sheets, all cut up into the sizes you need.
Having Home Depot make the
cuts for you is a huge advantage!
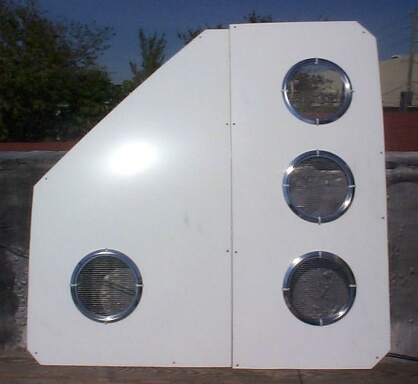
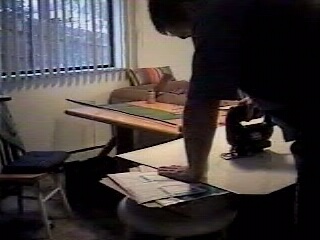
For the ceiling, it's fairly simple:
Place the 4x4 sheet on top of the cage and mark along the front door edge.
Cut the front corner
off, leaving you with your ceiling shape.
Trim the edges to fit in the same manner.
Tip: cut from the shiny side and then sand the edge smooth.
While you're at it, cut
off the three other corners, too.
Just measure 2 1/2" in from each corner,
draw a line and cut off the tiny piece.
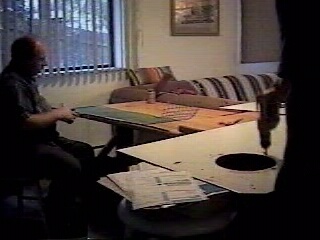
Now it's time to lay out the chrome trim rings...
You can use any layout
you like. I like about 5 1/2" in from the edges.
Just make sure that you leave room for a UVb light fixture.
Take the four trim rings
and lay them out on the shiny side.
Use a marker to trace the inside circle of each trim ring.
While your ring is still in place, mark North South East and West just outside
the ring --
which will be where you drill holes for the cable ties that hold the rings in
place.
Drill a starter hole just
outside the circle trace and use a jig saw
to cut a circle 1/2" outside of the traced circle --
that's about halfway between the circle trace and the hole marks.
The circle cut doesn't have to be a perfect circle --
because it's going to be hidden by the trim ring.
Use a drill bit that is
just slightly larger than your cable-ties to drill four holes,
positioning the holes just outside of the edge of the trim ring: N S E &
West.
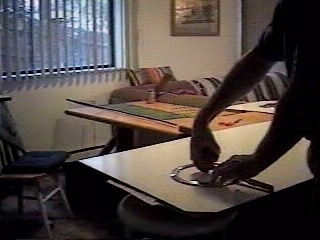
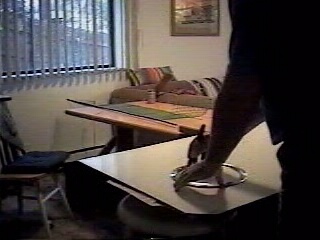
Okay, now flip the ceiling
over and cut a strip of uncoated wire cloth a little oversized: [T].
(That's Tom, by the way. He helped me build a few cages over the Summer.)
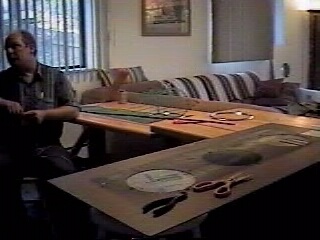
Now for the tricky part:
slide a trim ring underneath, lining it up so that you can see one of the four
holes.
Poke the cable tie down through the screen and back up through the hole, and
tighten.
(Hanging the panel over the edge of the table helps.)
The objective is to leave
the cable tie 'squares' on top to help hold the dome lights in place.
In fact, when you clip the ends of the cable ties, leave a little extra sticking
up...


Okay, now flip the ceiling
back over and drill a few holes 1/2" in from the outside edge --
to allow you to cable tie the ceiling to the cage.
I'd suggest putting the ceiling on top of the cage and marking for the holes
first.
I like to place the holes right next to the corners and T connectors.
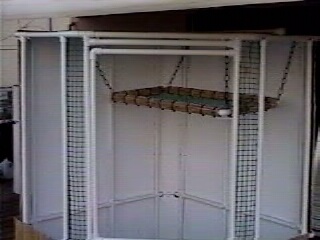
One last thing, whether you cut your ceiling in half or not, it needs support...
Cut a pole [U] and put the 3/4" caps on each end.
The support pole sits
up on top of the cage and the ceiling is cable-tied to it.
That gives plenty of support for all the stuff on top: dome lights, a UVb fixture,
and the timers plugged into powerstrips.
Timers, you say? Definitely!
In my experience -- iguanas like routine.
Having the lights go on and off at regular times is something that they will
come to count on -
whether you're there or not!
I suggest plugging four timers into two powerstrips
and set two of the timers for a '12 on 12 off' cycle -- and stagger the other
two.
Use four timers for the dome lights and plug a fifth timer
into the open slot of a grounded extension cord (the other two slots are taken
by the powerstrips)
and plug your UVb fixture into that fifth timer. Pile everything up on the cage
ceiling.
If you have any more open
slots on the powerstrips or extension cord,
I'd suggest keeping a heating pad always-on on the basking shelf.
By the way, those front
mesh panels around the door could just as easily be clear Lucite panels...
I just prefer the 1" mesh panels for hand-feeding, clear viewing,
and talking or listening to your lizard. I believe iguanas like listening to
the environment around them as well.
For a smaller lizard, I'd suggest substituting 1/2" mesh for the 1"
MultiNet.
If your home gets cold
in the Winter -- better go with the solid front panels.
You can save the mesh panels just for Summer use.
.....
Now we've done the
frame, the door, and the
ceiling. We still have
to do the back panels, the
windows, and the hanging shelves!
(Wouldn't it be easier with all the measurements? And maybe a Shopping List?)
I'll send them to you as soon as I get your Paypal email!
Use Paypal to get the measurements now.
Introduction | The Plans | The Cages | Q&A
Copyright 2001 2013 Lizardcages.com
All rights reserved.